As such, a straightforward repair job; cut the damaged wire and reattach to the transformer. Unfortunately, of course, the Power Adapter isn't meant to be repaired - there is no way to open the unit without damaging it (thanks to the "Leader for Success" blog for making this painfully clear).
So ... time for some controlled violence; using a sharp screwdriver, I "punch-opened" the plastic casing:
And so, after attacking three of the four sides (not the side opposite the cable), the unit could be opened (note that the insides are also glued (not too tightly) to the outside plastic, the inside is surrounded by copper plating and the outside plastic parts are lined with aluminium for heat dissipation):
Eureka ! After removing the copper plating from the insides (the inner plate is soldered to the circuit board), I had access to the circuit board (note the paste to connect the hot components to the copper plate heatsink):
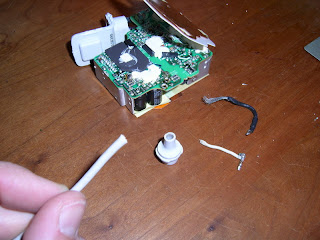
I then cut the low voltage power cable just past the point where it had fused and was surprised to see that it's a coax cable. I then "unsoldered" (for want of a better word) the 2 wires from the circuit board and fiddled them out of the rubber plug:
After all this destruction, it was time to put things back together again. The intact cable was fiddled through the rubber plug and I added a knot so any tension on the cable would not affect the solder points.
I stripped about 3,5 cm of the outer shielding and formed a wire, covered it with insulating tape and soldered it to the circuit board. The inner core was then soldered to the circuit board and finally I soldered back the (first and inner) copper plate. (See the notes on the second photo up). The other two copper plates were taped in place (as they were originally).
Then it was time to see if it would all fit in the plastic casing - nicely. I removed the burrs from the plastic where the screwdriver had damaged it and - lo and behold - it all fit !
Before closing it up for good, I tested the unit and was pleased to see it worked .. time to put it back together for good. As the edges of the two sides of the plastic case had been damaged, glue wouldn't be enough to hold it together so tape was needed:
.. You have to look really hard to see that it's been opened ..


2 comments:
Dank U
I was curious to see how easily this could be done...
You have saved me one day's wages and kept some plastic out of the landfill!
keep on blogging!
Thanks Groundshine.
Glad I've been of help -- just a shame manufacturers make it difficult to do a 'pretty'/nice job.
Post a Comment